| You will occasionally see such green boxes in the text.
The text inside will discuss special topics which are not relevant for
understanding the basic process. Please note that the methods
discussed here are only a subset of techniques for creating a
VR-Panorama. You are invited to also research your own methods - and not
only follow this tutorial word by word... |
Part 1: Equipment and Preparation, The Nodal-Point
What is the nodal-point?
Close one eye and look at the edge of your monitor. Now
rotate your head a little and keep looking at the edge of the monitor. You
will notice that the monitor's edge is changing its position relative to the
background.
If you would meet the nodal point, the objects would not change their
relative position. This is why a nodal point adapter is used in panoramic
photography. It helps merging images because every part of your scene looks
the same on every photo you take for your panorama.
| Here are some good sources how to exactly define the nodal
point of your setup:
|
Why Fisheye?
There are 2 different methods of taking photos for a full
360x180°-image:
A common wide-angle lens with 28-35mm demands about 30-50
photos that have to be stitched afterwards! Using a fisheye reduces the
number of photos down to 3-8. Especially in scenes with moving objects or
handheld photography you will notice
the advantages of 180° lens.
What are the basic techniques when using a fisheye?
With tripod:
If you want to minimize the effort and trouble in
creating your VR, use a tripod and a
nodal-point adapter. There are also professional ones available from
Manfrotto,
Kaidan,
Novoflex and others.
For starters: You don't have to buy a high-priced adapter
to begin. With a little effort you can also build your own one. Here are
some basic examples:
Metz-Rail
|
Metz Flash-Rail for the camera in landscape format. Your tripod's
camera screw must lie over the axis of rotation of the tripod.
Pro: The flash-rail is so small - you can carry it with you without
problems.
Con: You can rotate around the nodal-point but you cannot tilt the
camera! |

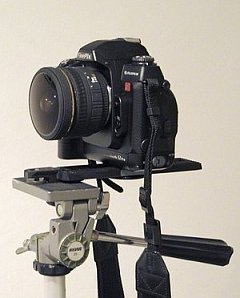
Aluminium-Adapter
|
Self-made aluminium adapter with a panorama-plate from
Novoflex. See
here for more details.Pro: You can also tilt the camera
around the nodal-point.
Con: Not very stable. |
Without Tripod:
The basic idea is to rotate yourself with the camera around
the nodal-point. Here are some good tricks to accomplish this:
| The
Philopod: What you need is a cord and a small weight. A small
bubble level will also help.
Fasten the cord on your lens - at the position of the nodal-point. A
fisheye lens has the nodal-point inside the lens (With the
well-known Sigma 8mm for instance you can use the golden ring as a
hint for your nodal-point)
Let the cord including the weight hang down. Now you have a
position on the floor where to turn around. |
 |
|
John Houghton has expanded this idea with a template that you
can lie down on the floor. |
 |
You may also take a look at my
handheld photography tutorial.
When you have done your first photos for a VR-Panorama -
Your will be ready to advance to...
Part 2: PTGui and the Control
Point Assistant |
