| The articles occasionally show such green Boxes. The
text inside is meant to present more background information and is not
needed for understanding the rest of the article. |
Why shoot freehand?
A very important part of the magic of interactive panoramas
is the possibility to be "in between the action". Mostly there is not much
time to photograph an interesting scene. Time (and space) to setup your
panoramic equipment will not be sufficient.
How to do it:
 "Equipment" "Equipment"
Even when talking about doing freehand panoramas there is a
clear limit on such a method. Scenes with very near objects need a very good
guess of the nodal point. Otherwise a lot of rework is needed.
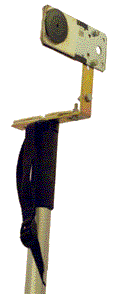
But you can use some lightweight supporting equipment as i do. You can see a
photo of my monopod with a supporting "L"-Bracket on the right.
Also, try to use a small spirit level. You will get straight
images with it and your images will stitch easier than without.
Take a quick look to the "360°-Aufnahmen"
(German). At least the images shall show you some other ideas to meet the
nodal point.
"Outside"
Step 1: Know your equipment
You panoramas will not succeed if you don't practice the
techniques before.
Before you start with your first freehand-panorama, do some
tests at home to get a feeling of your camera and equipment. You will have
no time for that when photographing your first "real" scenery.
Step 2: Take a few moments of time to analyze your scenery.
Are the any groups of objects which are difficult to
stitch?
Try to avoid overlap of images in these areas. Avoid overlap in areas
where near and far objects simultaneously appear.
-
Are the moving objects somewhere?
Avoid overlap in these regions. Shoot an image twice if you are not sure.
Try to shoot against the direction of the moving objects. This will help
for not re-appearing in your panorama twice.
-
If under pressure when shooting: Shoot as much
overlap as possible. If in question, shoot a region twice.
Step 3: Don't take too much time for shooting...
...but don't forget to fix exposure und white balance.
Afterwards, shoot an image of Sky and Floor (zenith and nadir).
"Inside"
Step 4: Set your control points mindfully.
-
Use control points with equal distance to the camera (this
is meant in the original scene, not in the resulting image!)
If not possible for the whole panorama, do it at least per image-pair.
This will help the optimizer a lot to find a correct solution.
-
Don't forget to use control points of type "line".
A tutorial about using "line" type control points can be found
here.
-
Weight your important image-parts.
Parts of the panorama which are crucial for correct fit can be enforced by
using more control points than for other regions of the panorama.
Afterwards you can do your first run of the "optimizer".
Only optimize x- and y-direction at the first time. Inspect the results.
Delete unimportant control points that are far away and not so
important. Now you can optimize again, including the rest of the
parameters (rotation and lens parameters).
Step 5: Manually blend your images.
You will need an image-editing tool which is capable of
layers (e.g. Gimp or Photoshop...)
Output your images as "multi-image TIFF", layered Photoshop or similar. Now
you can cautiously blend the images one by one using the layer brush. Also
use irregular patterns of the image to blend badly fitting parts of the
image.
Step 6: Use your creativity
I bet you will not be able to fit all your image parts
perfectls. So don't forget your creativity (and dont't forget if you are
using equirectangular projection).
Cut out badly fitting image parts and move them.
Because of panoramic projections this will only be possible for a very
small image area at once.
(Think of a railing where you may have to move some parts until the
railing will become one)
-
To fill holes in the resulting image, you can use the
stamp tool. This works good for trees or water.
Afterwards you can also correct your bad stitching errors by
duplicating parts of the panorama as a new layer and use the layer brush to
insert this part again at the correct position.
|
Erik Krause has descibed this method of Tom Striewisch
this way:
Create your new layer from the background layer by copying it. Now swith
off the underlying layer.
Paint by using the masking-mode (afterwards reverse selection) or layer-maska
hole in the upper layer. This should make the unwanted part of the image
disappear. Now switch on the lower layer and move it until the hole is
optimally filled. Now reduce layers to background layer.
A lyer-mask has the advantage that it can be easily edited afterwards
again. |
Step 7: Don't try to be too perfect!
Most crucial is a good blending of important parts of the
panorama. But only very few people will look at all parts of your
panorama with the same attention and interest... |